

If you need assistance with any aspect of editing branch information, please email us at .
Each branch can edit their own pages on the SRP website. If you would like to edit your branch pages, contact , who will give you ownership of your pages. The web editors are also happy to make changes on behalf of a branch.
To edit a page:
- Log in to the site by clicking the Login link on the right near the top of the page. (If you want to try out changes without actually changing the main site, you can log in to http://sandbox.srp.org.uk instead – but note that the sandbox doesn’t necessarily look exactly like the main site.)
- The first time you log in, you need to set a new password. The login dialogue guides you through the process. If you use the sandbox, please set different passwords for the sandbox and the main site.
- Once you are logged in, there will be a black bar at the top of the page. To edit an existing page, make sure you are on the page you want to edit, then click Edit Page in this bar.
- Edit the page as described in the following section.
- When you are satisfied, click Update to publish your changes. This can take a second or two – when it’s finished you will see a message saying Page Updated and a link to View page, which takes you back to the page on the site.
The following sections give more detailed instructions for editing branch pages, and the last section of the page gives instructions for administering branch music libraries. You can also edit your branch membership return on-line. Instructions for this are given on the membership help page.
There are still some things that you can’t do yourself:
- You can’t edit pages that don’t belong to your branch.
- Although you can create new pages and link to them from within the text of a page, you can’t add them to the menu that appears to the right of your branch pages.
- You can’t change the email address that your branch email is forwarded to.
If you would like any of these done, please contact .
If the instructions aren’t clear, you have any problems, or would like further instructions on any topic, please do contact .
The editor
Editing text and links
Inserting and editing tables
Inserting a picture
Inserting sound
Inserting a document
Inserting a video
Shortcodes
The editor
When you add a new page or post, or edit an existing one, you work in the editor, which shows the following:
- At the top right, buttons for changing the screen options and for getting help.
- The title of your page or post
- An area for editing the Permalink: please don’t change this.
- The main editing area. This has a button for uploading media and tabs labelled Visual and Text. The Visual tab should show the page more or less as it looks on the site, with a collection of editing buttons at the top.
- An area called Page Attributes. You can ignore this when editing.
- An area called Publish. This gives you a button to Preview the page and one to Update the page. If you click Preview you will see the page with your changes in a new tab, so you can make sure it is exactly as you want.
- A list of previous versions of the page – if you mess up catastrophically, you can always go back to an earlier version.
Editing text and links
The visual editor is similar to word processors like Microsoft Word. There is a toolbar at the top:

In the editor, you can hover the cursor over each button to show what it does. If your toolbar has only one row, click the ![]() Toolbar Toggle button to show the middle row.
Toolbar Toggle button to show the middle row.
Just below the toolbar there is a ruler, showing a mark every 20 pixels. This is to help you see what your page looks like at different browser widths. Whenever you make major edits, it is useful to check what the page looks like at different widths by resizing your browser to different sizes.
Typing directly into the editor formats the text into paragraphs: to start a new paragraph press Enter. The spacing between paragraphs is larger than the spacing between lines. To start a new line without any space, type Shift+Enter instead of Enter. Within a table cell, you can switch the paragraph spacing on and off by clicking Paragraph from the drop down box.
For headings and subheadings, choose Heading 2, Heading 3 and so on from the drop down box, rather than formatting them yourself. This gives a consistent style across the site. Note that Heading 1 is reserved for the page title.
To link to another page, select the text you want to use as a link and click the ![]() button. This puts a link box next to the text, but it’s best to click the gear wheel there to get the full link dialog Then either type in the permalink of the page you want to link to (or any other URL you want, of course), or use the search box. You can also use pictures as links.
button. This puts a link box next to the text, but it’s best to click the gear wheel there to get the full link dialog Then either type in the permalink of the page you want to link to (or any other URL you want, of course), or use the search box. You can also use pictures as links.
Inserting and editing tables
You can insert and edit tables using the table  menu on the bottom toolbar. To help you see the structure, cell borders that are invisible in the real page are shown in dotted blue in the editor.
There are some special classes for formatting tables, shown in the Formats menu. You can apply the appropriate class whenever the cursor is within a table..
One is class plaintable, which produces a table with no visible borders. To help you edit a plaintable, the cells are outlined in dashed blue lines when editing.
A more complicated set of classes, under the heading Programme in the Formats menu, is used for branch programmes like this example:
| 25th February | Conductor: Pete Willis | |||
| Frescobaldi | Canzona | SATB | Faber | |
| Palestrina | Ricercare (Primo il Toni) | SATB | Faber | |
|
31st March |
Harvey | Suite no 1 | SATTB | Chester |
| Widor | Andante Cantabile | SATB | OL 207 | |
| There will be a raffle at this meeting | ||||
This is a table with six rows and five columns. To achieve this appearance, you need to do two special things:
- Use the table menu to Merge cells so that each date spans all the rows for that date, and general information like that about the conductor and the raffle spans all four columns of the programme.
- Use the Programme group in the Formats menu to set the class of the table and of the individual cells within the table so that there are borders only where you want them and the spacing is correct. The class of the table as a whole is set by clicking Programme table. Setting this class means that cells within the table do not normally have borders or padding, like the cells containing the composer, title etc in the example. To get a border round the date, set its class using Date. Similarly, to get a line above the conductor (and a little spacing round it) set the choose Conductor as its class. If, as on 31st March, there is no conductor listed then click in any the four cells in the first row of the programme for that date and chose the class Date first row. If you want a comment at the end of the programme, as on 31st March, set its class to Comment.
Inserting a picture
Pictures can be inserted anywhere in your page. Before inserting a picture, it’s a good idea to make it reasonably small. In most cases there is no point in having a picture more than about 1,000 pixels wide.
To add a picture, click the ![]() button. Choose the Upload Files tab and then either drop the picture you want into the dialog box or click Select Files and choose the picture you want. After it has uploaded, wait until a screen of information like this appears.
button. Choose the Upload Files tab and then either drop the picture you want into the dialog box or click Select Files and choose the picture you want. After it has uploaded, wait until a screen of information like this appears.

Title is what you want to appear when the user hovers the mouse over the picture.
If you type a caption, the picture will appear slightly separated from the text, and the caption will appear underneath, like the one below.
Alt text is usually the same as Title.
Description is for your own use and doesn’t affect the appearance of the page
Alignment and size are self-explanatory; you can change the size afterwards by dragging a corner or edge.
If you leave Link to unchanged, then clicking the picture will display the full size picture on a page of its own. If you don’t want this, select None or, if you prefer, put in the URL that you would like the picture to link to. Don’t click Attachment Post URL, which is some arcane WordPress thing that neither I nor, as far as I can see, anyone else can understand.

To finish, click Insert into Post.
Once you have uploaded a picture (or a sound or a document), you don’t need to upload it again. If you delete it from the page and want to get it back, or you want to show it on a different page, you can find again by clicking the Upload/Insert button and choosing the Media Library tab.
Inserting sound
To insert a sound file, click the  button. Choose the Upload Files tab and drop the file into the dialog box or click Select Files and choose the sound file you want. After it has uploaded, wait until a screen of information like this appears.

Title is what will appear as a hyperlink to the sound file, as shown below. Use Embed or Link to choose how the sound will appear on your page:
Embed Media Player will insert a media player bar directly into the page
Link to Media File will produce a link which, when clicked, will play the sound, like this Glen Miller
Link to Attachment Page will create a new page that contains a link to the sound, and link to that page – I don’t recommend this.
Inserting a document
If you want to link to a document such as a report, then you should first turn the document into pdf.
To add a document, click the ![]() button. Choose the Upload Files tab and then either drop the document into the dialog box or click Select Files and select the document from your files.
button. Choose the Upload Files tab and then either drop the document into the dialog box or click Select Files and select the document from your files.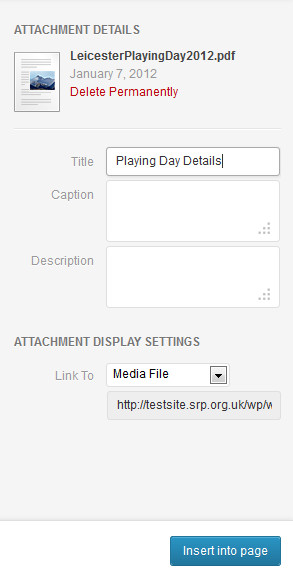 Type the text you want to appear in the link into the Title box and Choose Link To Media File. When you click Insert into page a link to the file will appear.
Inserting a video
To show a video on your page, first put the video on to YouTube, and then share it from YouTube on your page.
To put the video on YouTube, follow the normal YouTube procedure. If you want the vide to be viewed only from the SRP pages, and not directly from YouTube, then make it Unlisted: in the Video Manager page, select Edit then Info and Settings, then under Privacy Settings choose Unlisted.
To share the video on your SRP page, click the video in YouTube then click Share.Then click the Embed button, and you will see a screen like this:

Make sure that the box Show suggested videos when the video finishes is not checked (and none of the other boxes is checked either). Choose the size you want if it’s not the one shown. Copy the embed code (the highlighted text).
Now go to your SRP page editor:

Choose the HTML tab and find where you want to embed the video:

and paste the embed code directly into the HTML at that point:

When you return to the Visual tab, you will see a yellow placeholder for the video:

Shortcodes
You can create additional formatting using “shortcodes”. To add a shortcode, click on the Extra Shortcodes button at the top of the page, and choose the one you require.
This page uses accordion shortcodes to format the content into collapsing panes. You can also use tab shortcodes, to format content into different tabs. NB: you can nest an accordion within tabs, or tabs within an accordion, but you can’t nest tabs within tabs, or accordions within accordions.
Here is an example using shortcodes to create tabbed content:
Typing this:
[tabs][tab title="First" start="open"]

First tab content

[/tab][tab title="Second"]

Second tab content

[/tab][/tabs]
Produces this:
First tab content
Second tab content
Click + New then Page to go to a blank page in the page editor. Give the page a title where it says Enter title here. This also creates a Permalink for the page – a reference you can use to link to the page. For example, if your page is called Our Picnic the permalink will be https://www.srp.org.uk/our-picnic.
When adding a new page you need to set a Template for the page by scrolling down to the Page Attributes section and choosing from the drop-down box. The Template determines what menus go to the left and right of your page. Normally you should set it to the template whose name is your branch name.
You also need to let users find your page. You can do this by linking to your new page from an existing branch page. If you want the new page to appear in the right hand menu for your branch, then please contact the web editor – you can’t do this yourself at the moment.
Click + New then Event to add a new event using the event editor, which has the following sections to complete:
The Event Title text box is at the top of the page. Below this are the Event Details and Event Description boxes, and to the right is the Publish and Categories boxes.

Complete the Event Title, and the relevant fields in the Event Details box. To ensure the event appears on the Playing Days pages, you must also select Playing Day and Branch in Event Categories. You can also add an extended description of the event in the Event Description box.
Event Title
Use the name of the organising branch, e.g. “Essex Branch”.
Event Details – Event Date
- To edit the date fields, either use the date picker function, or type the date into the box in the format DD MMM YYYY (e.g. 03 Oct 2020).
- You can optionally add an Event Time – please use the 12h format (e.g. 10am or 4.30pm).
Event Details – Short Description
- Use “Playing Day with [conductor]” e.g. “Playing Day with Michael Graham” as the Short Description.
Event Details – Venue and Address
- Complete the Venue field with a descriptive address, e.g. St George’s Church Hall, Brentwood, Essex.
- Complete the Address field with the postcode of the venue. This field is not displayed, but is used to add the event to the Events Map.
Event Details – Website
Provide a link to your branch Website, and provide some Display Text, e.g:
| Website | https://www.srp.org.uk/essex | Display Text | Essex Branch Home |
Event Details – Image
If you have an image you would like to include, use the Event Image option near the bottom of Event Details to add the image. [NB: don’t use the featured image option, which is in a separate box].
If you would like to include more details about the playing day, and/or a link to the application form, you can use the Event Description box to add extended content.
Event Description
The Event Description box allows you to add and edit content in the same way as you would a regular page.
You can preview the event by clicking on Preview in the Publish box. When you are ready to publish the event, click the Publish button in the Publish box. Once the event has been published, click the View Event link above the Event Title to view the event on the website. If you need to make further changes you can use the Edit Event option in the black menu bar. As a final check, make sure that the event appears on the Playing Days page.
There is further information about Editing Events on the Adding Events Page.
If you click the link on your branch venue page that says “see here for a map” you will see a map showing your branch venue(s). If you are logged in, you will see buttons to edit your main venue and to edit or delete your second venue (if you have one) or create one if not.
If you click the edit button, you get a form that allows you to edit the details of the venue and the marker on the map becomes moveable. Move the marker to the new location (the new lat/long appears on the form) and/or change the details, and press Update to confirm the change.
Overview
Link to your catalogue
Record loans
Add new items
Remove items
Edit existing items
Branch-specific information
Private catalogue
Spreadsheet
Overview
You can hold information about your branch music library on the website and, if you wish, administer it yourself. To get your library on to the site in the first place, you can use one of two methods
- if you already have a catalogue in, for example, Excel or Word, the web editor can load the catalogue onto the site for you.
- if not, you can add the items yourself as described below. This is quicker than making a catalogue in some other form first, because for the vast majority of composers and many pieces of music, the information is all filled in for you automatically. It also avoids inconsistencies in the way composers and pieces are named.
The catalogue records, for each of your items:
- Composer
- Title
- Arranger, if any
- Reference, for example publisher and number
- Number of players
- Scoring
- The number of scores that you have
- The total number of parts that you have. (For example if you have 2 copies of each part for a quartet, the total is 8)
- Up to two pieces of branch-specific information. You can use these for whatever you like – for example a catalogue number. You can also choose whether each should be public or restricted to your branch use only.
- An loans of the item
Once your catalogue is on the site, anyone can use the Branch Music Libraries page to browse and search the public information your library, send you an email to request loans, or produce a printable catalogue of your public information arranged either by composer or by number of parts.
To administer your library, log on and go to the branch music libraries page. Click the Administer tab. This takes you to the administration page.
Link to your Catalogue
To allow users to download a printable catalogue of your library from your branch pages, provide a link like the following, replacing OXF with the three letter code for your own branch:
/brmusiclibs/bmlactions.php?action=catalogue&branch=OXF will generate a catalogue in composer order
/brmusiclibs/bmlactions.php?action=catalogue&catOrder=nPlayers&branch=OXF will generate a catalogue in order of number of players
Loans
To record the loan of an item, use Search or Browse to find the item that you want to loan. Click the right arrow next to the branch name: this will show the details of your holding. There is a button that is labelled Loan (or, for items that have already been loaned, Loans(…) where the number of current loans is shown in parentheses). Clicking this brings up a dialog in which you can enter the name of the person to whom the music is being loaned and any notes you may want to make about the loan, Click Issue Loan to record the loan. Details of any earlier loans are shown below the dialog.
To record the return of a loan, find the loan by checking the Current loans or All loans box in Search. The loans dialog will show the selected loans, with the date they were recorded. Click the Return button to return the loan.
Add New Items
Click the Add/Edit Entries tab. This shows a form with boxes for entering data. Most of these boxes fill in automatically as you type information.
Composer
First, choose the composer. Start typing the name and you will see known composers that match what you have typed (or click the arrow on the right to see all known composers). If your composer is not known, type their name and initials, surname first: (for example ‘Bach, J.S.’). The new name will appear in the list in white, followed by ‘(new)’ : select that entry..
Item
The item title box works in a similar way to the composer box. If you selected a new composer, simply type the title of the item and fill in the remaining details as described below. If you selected a known composer, then you start typing the title to show a list of matching items, or click the arrow on the right to get a list of all known items by that composer, If this is a new item, type the whole title and select the (new) entry in white. Known items are shown with a green background, preceded by a plus sign if you do not have a holding recorded, and with a yellow background preceded by a Δ if you do.
If this is a new item then fill in the details:
- Arranger is the name of the arranger, if there is one. As with the composer, you can choose an existing person or add a new one.
- Ref is the publisher and reference number: for example ‘Oriel OL123’, ‘Hawthorns RA123’ or ‘LPM EML23’. For Alex Ayre arrangements, just use the CRCS number, for example ‘CRCS 123’.
- No. players is the number of recorder parts. You must give a single number; if some parts are optional, then don’t include them in this number.
- Scoring is the recorders needed, for example ‘S A A T B’. Use the abbreviations Sop, S, A, T, B, Gb and C. Use A8 for alto played up an octave. Show alternatives, optional parts and non-recorder parts: for example ‘S S/A8 A/T B +opt Gb Kb’.
If you start filling in this information and decide to go back to the list of known items, you can simply go back and choose a different item or even a different composer.
Holding
- Scores is the number of scores that you have – if none, fill in ‘0’
- Total parts is the number of separate copies of the parts. For example if you have 1 set of parts for a quartet, enter ‘4’; if you have 3 soprano parts and 4 of all the others, enter ’15’.
- Private 1 and Private 2 are for your own branch use. For example you might want to use one for a catalogue number or a note of where the item is kept. These fields are not shown to other users of the library.
Click OK to add the new holding.
Special Cases
All the above assumes that an item is a single composition with a single composer and at most one arranger. However, this is a simplification: in reality there are anthologies of iterms, sometimes with different composers. I suggest the following conventions for dealing recording such things.
Collection of pieces by a single composer
- These can be treated as a single item. Title can either include the titles of each piece, for example ‘Aechiopica & O Nachbar Roland’; or (especially if it a is a large collection) the title of the collection itself, for example ‘Two Canzonas’.
- Alternatively, particularly if they have different numbers of players or different arrangers, each piece can be listed as a separate item. The Title should indicate that the piece is part of a collection, for example ‘Aechiopica, in Two Canzonas’ or ‘Aechiopica (with O Nachbar Roland)’.
If you are adding a holding for a collection that is already known, you must of course follow whatever method has been used. For example if you have a holding of these two canzonas and it has been added to the library by another branch as two separate items, you should add a holding for each item.
Collection of pieces by different composers
- If there is a large number of short pieces, the collection is probably best treated as a single item. The Composer should be ‘Anon’. (The library does not have separate “composers” such as ‘Anthology’ or ‘Various’, since there are too many different possibilities.)
- Smaller collections can be treated as separate items, as above. For example you can have an item ‘Liberty Bell, in Two Marches’, or ‘Liberty Bell (with Teike Old Comrades)’. .
Remove items
You can remove an item from the Search, Browse or Add/Edit Entries tabs. This will delete your holding but will not remove the item itself, because that is shared with other branches. If an item should be completely removed for some reason, please contact the web editor.
Either
- Click Search or Browse to find the entry that you want to delete. Click the branch name/down arrow on the right, or
- Click Add/Edit Entries, find the item by selecting from the composer and title boxes
Click the Delete button, then click OK in the confirmation dialogue to confirm the deletion.
Editing existing items
Note that you can only change the information about your own holding; you cannot change any other information about the item such as the title or composer, because that is shared with other branches. If this information is wrong, please contact the web editor to correct it.
Either
- Click Search or Browse to find the entry that you want to delete. Click the branch name/down arrow on the right. Click the Edit button, type the new information and click Update. or
- Click Add/Edit Entries, find the item by selecting from the composer and title boxes. Type the new information into the holding section and click Save.
Branch-Specific Information
There are two fields in the database, private1 and private2, for your own use. By default they are not used. If you want to use just one, it’s best to use private2, because of the way the the search results and catalogue are laid out. To use one or both of these fields:
- Click the Branch Settings tab
- For each field that you want to use
- choose a short name for the field – for example “Notes”. (To ensure a neat layout of the pdf catalogue, you should choose a name no longer than the longest content in the field.)
- choose whether the field should be Private or Public. If it’s private, it will only be visible on-line from the admin page, and will not appear in a catalogue available to the public. If it’s public, it will appear on the Branch Music Libraries page and in catalogues downloaded from any public page.
- Click Change.
Private Catalogue
The Catalogue tab is just like that on the public Branch Music Libraries page, with the addition of a checkbox for including the private branch specific fields in the catalogue.
Spreadsheet
You can download a simple spreadsheet of your holdings. To do this, click the Make Spreadsheet button. This will download a plain text file in .csv format, which you can open in Excel (or Open Office Calc) or save.
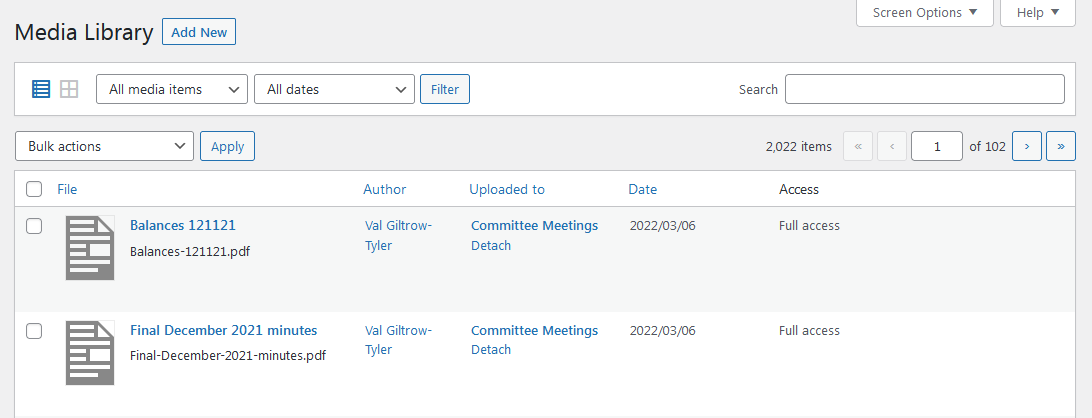
Make sure the ![]() icon on the top left is clicked, to show the list view. Find the item you want to replace. You can do this by using the search box or by browsing the list. To narrow down the search you can choose the type of item from the menu then click Filter. You can order the list by clicking any of the column titles.
icon on the top left is clicked, to show the list view. Find the item you want to replace. You can do this by using the search box or by browsing the list. To narrow down the search you can choose the type of item from the menu then click Filter. You can order the list by clicking any of the column titles.
Once you have found the item you want to replace, hover the cursor over it and click Replace media from the menu that appears. Choose the new file that you want to replace the old one with. In the Replacement Options box I recommend that you select Replace the file, use new file name and update all links (otherwise users might still see the old version because of browser caching). Then click Upload to complete the replacement.